
Integrating IrisAgent Search with your Zendesk Ticket Form
Introduction
IrisAgent's AI can power search and ticket deflection on your Zendesk Ticket Form to deflect customer queries and reduce the number of tickets handled by support agents.
Installation Guide
- Set up the ticket form (if you already have a ticket form set up, you can go to the next step). Please follow this link to setup zendesk ticket forms.
- Navigate to the Customize Design tab in your Zendesk Help Center. This can be found under Zendesk Guide > Guide Admin > Customize Design.
- Edit your theme. You can either add a new theme by selecting Add theme and making a copy of your Live theme by selecting the three dots > Copy. If you would like to edit your existing theme directly, click on Customize under your Live theme.

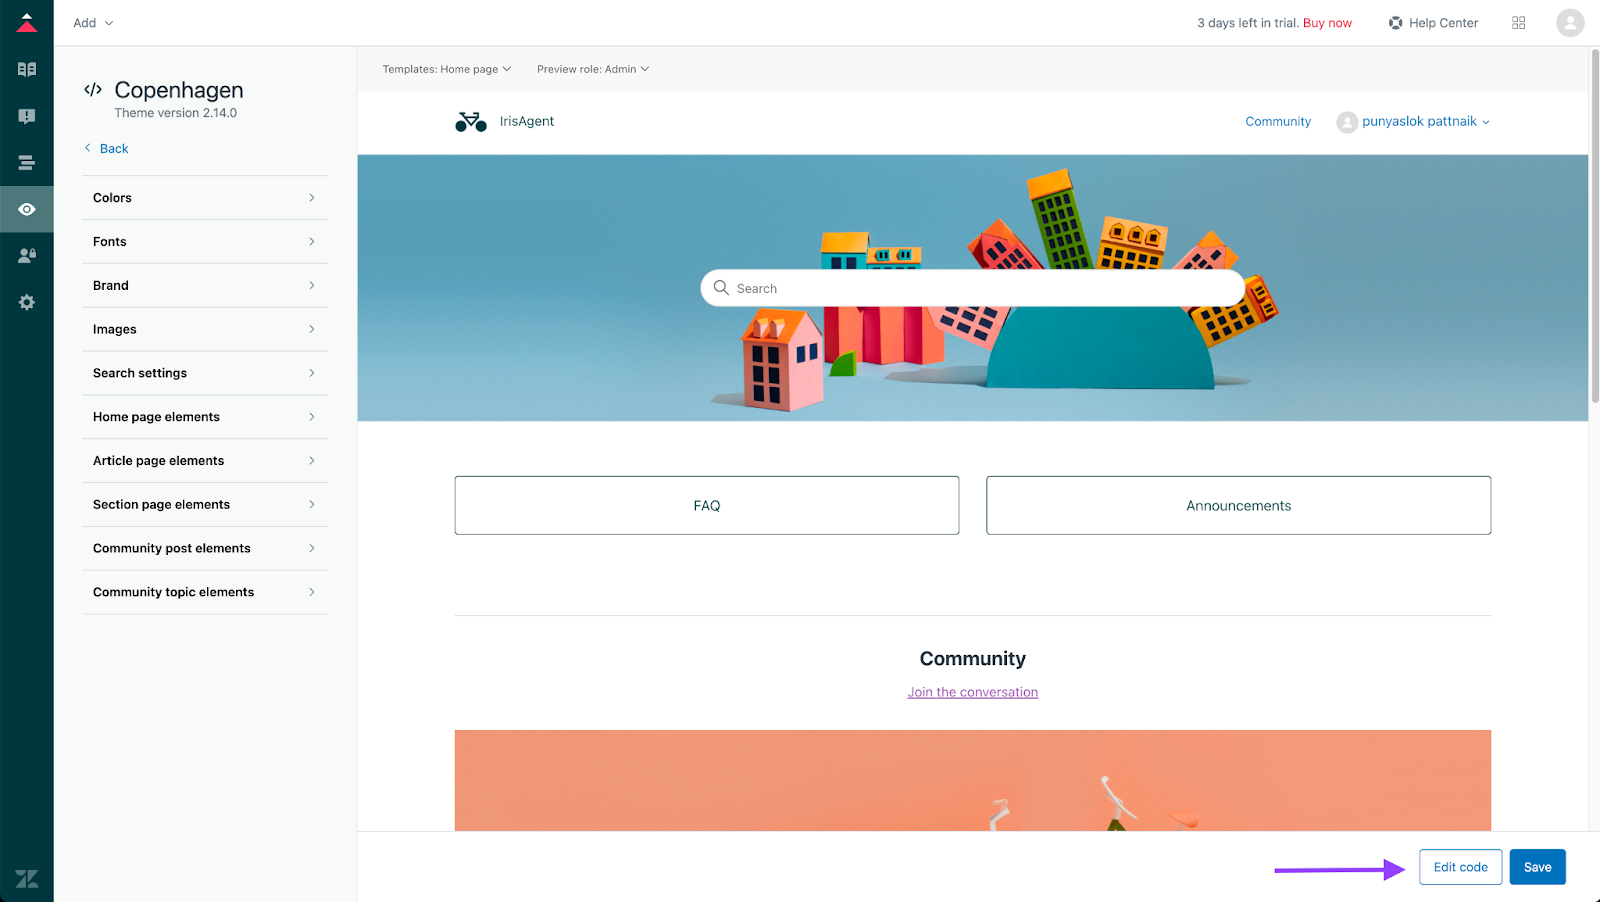
- In order to replace the default Zendesk search bar with the IrisAgent search bar, you will need to edit the code. After clicking on the Customize button in the previous step, Click Edit Code in the bottom right corner:
- Navigate to the New Request Page. Once in the editor, on the left hand side, click on the new request page (new_request_page.hbs) file.
- Within new_request_page.hbs file, add in the following lines underneath your request_form:
<script src="https://code.jquery.com/jquery-3.6.0.min.js" integrity="sha256-/xUj+3OJU5yExlq6GSYGSHk7tPXikynS7ogEvDej/m4=" crossorigin="anonymous"></script> <script src="https://benalman.com/code/projects/jquery-throttle-debounce/jquery.ba-throttle-debounce.js"></script> <div id="irisagent-zendesk-ticket-form-search-bar"></div> <iframe src="https://app.irisagent.com/zendesk/zendesk-ticket-form-searchbar/getZendeskTicketFormSearchBar?businessId=REPLACE_ME_BUSINESS_ID" id="irisagent-ticket-form-search-iframe" frameBorder="0" style="width: 45%; min-width: 45%;"> </iframe> <script src="https://app.irisagent.com/public/zendesk_ticket_form_searchbar_listeners.js"></script> - Note: Insert your account business ID in the above code for REPLACE_ME_BUSINESS_ID. This is a secret that will be shared to you by IrisAgent.
- Now that the IrisAgent search bar is going to be displayed in the home page, the default Zendesk search bar can be deleted from the code. To make the deletion, remove the entire
<div class="search-container">and all the code inside the div. - Also within new_request_page.hbs, add a support_container div and a new-request-div class around the form and the IrisAgent search bar.
- The result of the above steps will look as follows:
<div class="container-divider"></div> <div class="container"> <nav class="sub-nav"> {{breadcrumbs}} </nav> <div class="support-container"> <div class="new-request-div"> <h1> {{t 'submit_a_request'}} <span class="follow-up-hint"> {{follow_up}} </span> </h1> <div id="main-content" class="form"> {{request_form wysiwyg=true}} </div> </div> <!-- new-request-div closing tag --> <script src="https://code.jquery.com/jquery-3.6.0.min.js" integrity="sha256-/xUj+3OJU5yExlq6GSYGSHk7tPXikynS7ogEvDej/m4=" crossorigin="anonymous"></script> <script src="https://benalman.com/code/projects/jquery-throttle-debounce/jquery.ba-throttle-debounce.js"></script> <div id="irisagent-zendesk-ticket-form-search-bar"></div> <iframe src="https://app.irisagent.com/zendesk/zendesk-ticket-form-searchbar/getZendeskTicketFormSearchBar?businessId=REPLACE_ME_BUSINESS_ID" id="irisagent-ticket-form-search-iframe" frameBorder="0" style="width: 45%; min-width: 45%;"> </iframe> <script src="https://app.irisagent.com/public/zendesk_ticket_form_searchbar_listeners.js"></script> </div> <!-- support-container div closing tag --> </div> - Head to your style.css file and add in CSS for the support container under the .container CSS:
.support-container { display: flex; } - Also in style.css, under the “/***** Request *****/” comment, add in CSS for the new-request-form:
.new-request-div { position: relative; max-width: 55%; width: 55%; padding-bottom: 50px; margin-right: 5%; flex: 1.5; } - Save your work. Click Save.
- [optional] You can click on the preview button on the left side of the editor to see how the layout looks before deploying it.
- If you are using a Live theme, you can choose to “Publish” your work.
- That’s it, done! You should be seeing the IrisAgent search bar on your help center home page.